
Stripe payment links and checkout sessions can collect up to three custom fields from your customer at checkout — a text box, a dropdown, or a number. Parcelcraft can print what your customer enters directly on the shipping label: as the company line of the delivery address, or as custom text lines printed below the address.
Common uses:
- A Company field, so deliveries to office buildings and shared spaces reach the right recipient.
- A dropdown for a product choice (a size, a color, a meal selection) that your warehouse needs to see at a glance while packing.
- A short gift note or handling instruction.
Step 1: add a custom field to your payment link
In the Stripe dashboard, go to Payment links and create a new payment link or edit an existing one. Expand Advanced options and check Add custom fields, then choose the field type (text, dropdown, or number) and give it a label your customer will see at checkout. Click Add another field for up to three fields per link:
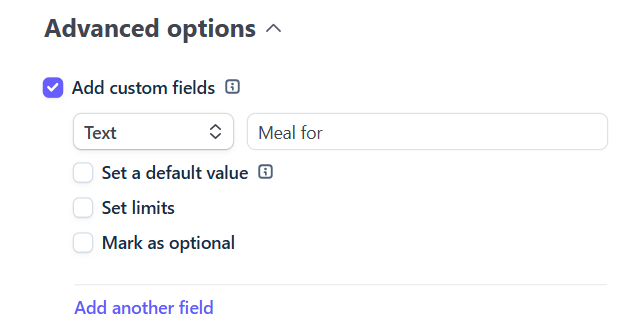
If you create checkout sessions through the API instead, pass the same fields in the custom_fields parameter when you create the session.
Each field has a key (its API identifier, generated from the label for dashboard-created fields) and a label (what your customer sees). Parcelcraft maps fields by key, so the same key used across several payment links only needs to be mapped once.
Step 2: turn on custom field mapping
- In the Stripe dashboard, go to Payment links and open the Parcelcraft Shipping app from the side panel. You'll see the Payment link settings view.
- Turn on Print user-entered custom field data from payment links and checkout sessions on my shipping labels.
Parcelcraft then scans your recent payment links and checkout sessions for custom fields to map. If none are found yet, you'll see this notice:
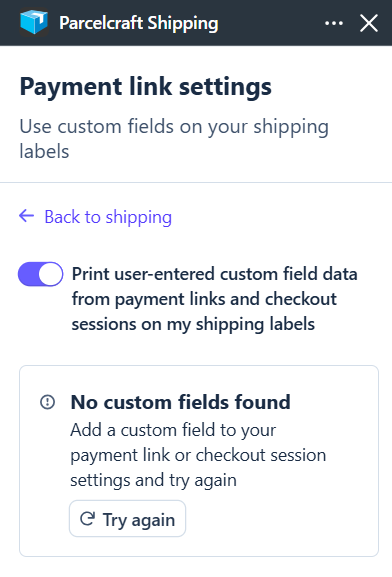
Add a custom field to a payment link or run a checkout that includes one, then click Try again.
Step 3: map each field to a label position
Each custom field Parcelcraft finds appears in a table. Choose where its value should print:
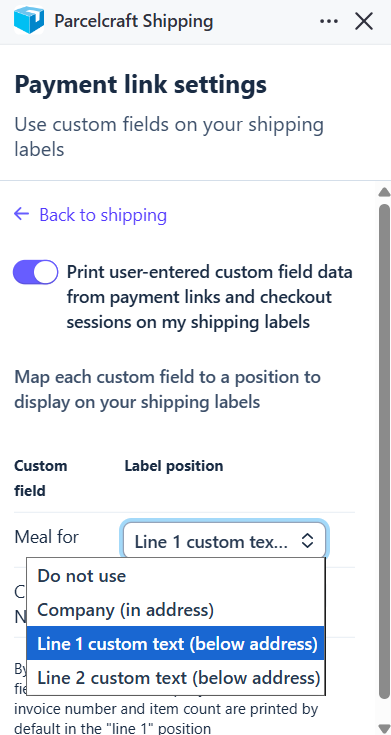
| Label position | Where it prints |
|---|---|
| Do not use | The field is ignored. |
| Company (in address) | The delivery address block, on the company line under the recipient's name. |
| Line 1 custom text (below address) | The first custom text line printed below the address. |
| Line 2 custom text (below address) | The second custom text line printed below the address. |
A few defaults to know:
- If you don't map anything to Company, Parcelcraft still fills the company line when it can: orders shipped from the Orders list use the business name Stripe collects at checkout, and the
companyvalue in the customer's Stripe metadata serves as a fallback. A mapped custom field takes priority over both. - If you don't map anything to Line 1, Parcelcraft prints the invoice number and item count there by default. A mapped field replaces that text.
- Label space is limited — keep the values your customers can enter short, or carriers may truncate the printed text.
How mapped values reach your shipments
Once mapping is on, no further action is needed per order. When a customer pays through a payment link or checkout session, their entries are applied automatically wherever you create the shipment — the Orders list, bulk shipping, 1-click shipping, and the Create shipment view, where the values appear in the address and shipment options fields so you can still edit them before buying the label.
- Text fields print exactly what the customer typed.
- Dropdown fields print the selected option's value.
- Numeric fields print the number.
- Fields the customer left blank are skipped — defaults like the invoice number line are used instead.
Testing your mapping: run a test checkout on your payment link, then print a test label for that order. The mapped values appear on the test label exactly as they will on a real one.