
Parcelcraft simplifies the international shipping process by automatically generating a customs sheet based on the customs descriptions and tariff codes associated with each product. This feature ensures that your international shipments comply with customs regulations and reduces the risk of delays or additional fees.
As soon as a shipment's destination country differs from your origin country, the customs declaration appears right in the shipment view — items, values, and weights prefill from the order and your international defaults, and your entries save as you type. The step-by-step walkthrough below covers the whole flow.
Parcelcraft also attaches tax identifiers to your shipments: sender tax IDs (IOSS, EORI, GST, VAT, and more) prefill from your Parcelcraft tax settings, and receiver tax IDs prefill from your customer's Stripe tax IDs, so carriers can clear your packages through customs without extra paperwork.
Print an international test label
In this tutorial, we will guide you through manually creating an international shipping label using Parcelcraft. Typically, most of the information entered during this tutorial would be automatically populated from the invoice and the defaults set up in the Enable 1-Click Shipping and international defaults sections.
Step 1: Start a blank shipment
- Open the full-page app — in the Stripe dashboard's left sidebar, click Apps, then Parcelcraft Shipping — or open the Parcelcraft drawer from the app tray at the top right.
- Click the + Create shipment button. This opens the Create shipment view with a blank shipment prefilled from your defaults.
Step 2: Enter the shipment information
- In the Ship to fields, enter an international address — any address outside your origin country.
- Fill in the weight, dimensions, and carrier information for your shipment. The service dropdown automatically filters to services that support international delivery for the selected carrier.
Step 3: Fill out the customs declaration
As soon as the destination country differs from your origin country, the customs declaration appears automatically — there is no separate dialog to open, and your entries are saved as you type. (In the shipment view it appears inline below the shipment options; when shipping in bulk it gets its own Review customs tab.)
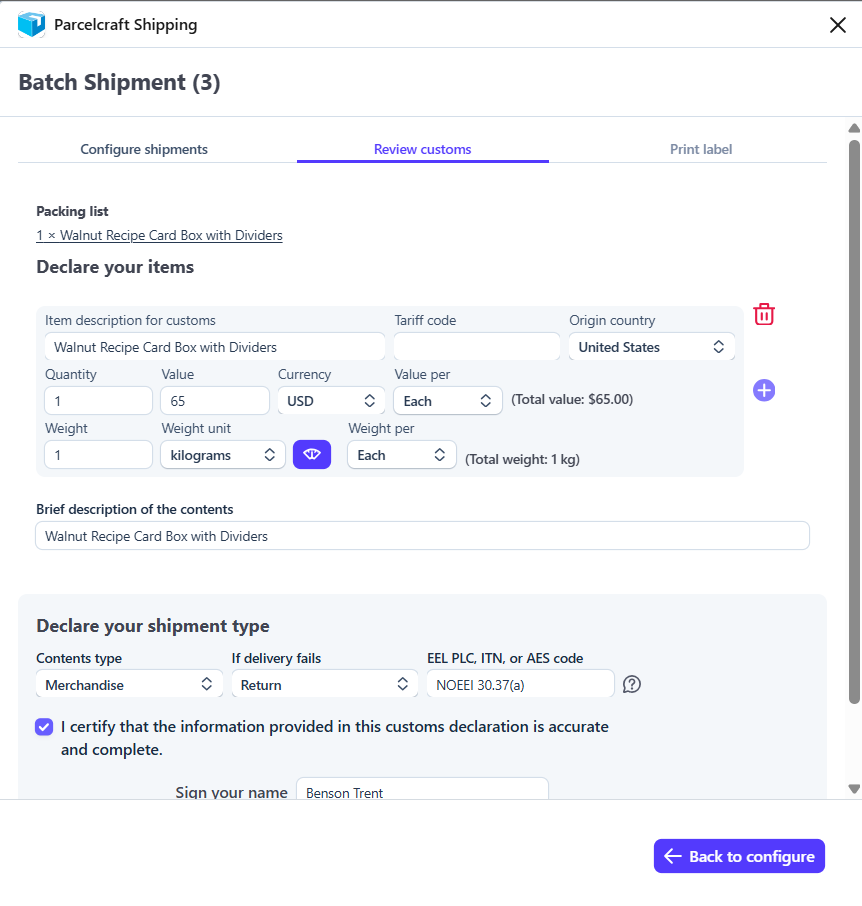
Complete the declaration:
Declare your items — one entry per product in the package, prefilled from your international defaults and the order's packing list:
- Item description for customs
- Tariff code (HS code)
- Origin country
- Quantity, value, and currency (per item or total)
- Weight (per item or total)
Finding a tariff code: Look up your product in the official Harmonized Tariff Schedule if you ship from the US, or ask an AI assistant like Claude to suggest a code from your product description and then verify it against the official schedule. The first six digits of a tariff code are standardized across countries by the World Customs Organization, so a code that's correct at six digits travels well internationally.
Every item also needs a weight — carriers won't quote an international shipment with weightless customs items.
Declare your shipment type — the contents type (merchandise, documents, gift, and so on), what the carrier should do if delivery fails (return or abandon), and an EEL PFC, ITN, or AES code where required.
Certify — check the box confirming the declaration is accurate and sign your name. Your signature is remembered for future shipments.
You can't buy a label while the customs declaration is incomplete — the button at the bottom of the view reads Review customs until every required field is filled in.
Step 4: Get a quote
Click Get Quote. The quote returns the shipping service levels that are valid for your shipment based on its destination, weight, and dimensions.
If the quote returns errors, read each message and fix the shipment — most quote errors on international shipments come from an incomplete customs declaration, an invalid tariff code, or a missing item weight.
If you still can't find a rate, set the Carrier dropdown to Quote all carriers and quote again to compare every connected carrier. If another carrier returns rates, the selected carrier or service doesn't support the shipment — not the shipment itself.
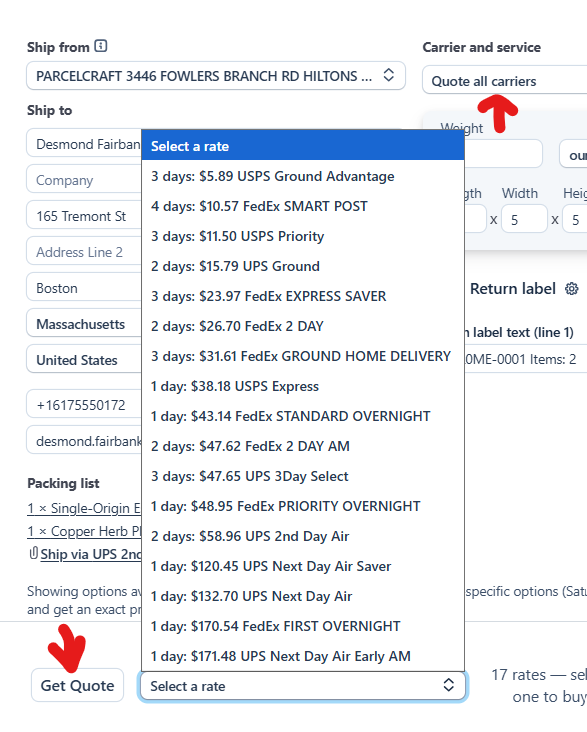
Select the rate you want to use for the test label.
If no carrier returns a rate, see Troubleshooting for more things to check, such as address verification and package size limits.
Step 5: Print the test label
- Click Print test to generate a test shipping label and customs sheet.
- The Print label tab opens; click Print Label to open them in a new browser tab.
- Review the label and customs sheet for accuracy, then print them or save them for your records.
Tip: If the test label doesn't open or print as expected, double-check your printer settings and ensure that your printer is connected and functioning properly. You can also review the settings on the Printers & digital scale tab to make sure they are configured correctly for your setup.
When shipping for real, attach the printed customs sheet to your shipment, typically in a clear plastic pouch or envelope, as required by your shipping carrier.
If you encounter any issues or have questions during this process, don't hesitate to reach out to support@parcelcraft.com for assistance. Our support team is available to help you troubleshoot any problems and ensure a smooth experience with the Parcelcraft platform.
Setting international shipping defaults
To enable seamless international shipping with Parcelcraft, follow these steps:
Define shippable products: In the Shippable products tab of the Parcelcraft Settings page, enter the customs description and tariff code for each product you plan to ship internationally. This information will be used to populate the customs sheet. Incorrect descriptions or tariff codes can cause shipment delays. The US government has a searchable tariff schedule at https://hts.usitc.gov/.
Save your tax IDs: In the Tax IDs section of the Main settings tab, save each tax registration you hold — IOSS, VOEC, EORI, VAT, GST, EIN, and more — with its type, number, and issuing country. You can save as many as you need, and they prefill onto every shipment as sender tax IDs; your customer's tax IDs prefill from their Stripe record. Carriers pass these to customs to speed up clearance. See Tax identifiers for details.
Configure carrier settings: Ensure that your chosen shipping carrier supports international shipping and that you have the necessary account credentials set up in the Carrier defaults tab of the Parcelcraft Settings page.
Tax identifiers
Many countries require a tax identifier on the customs declaration — an IOSS number for low-value goods into the EU, a VOEC number for Norway, an EORI or UKIMS number for the UK, a GST number for Australia or Canada, and so on. Carriers transmit these IDs to customs so your shipments clear without delays or surprise fees, and a few carriers also use tax IDs for specific domestic locales.
Parcelcraft attaches two kinds of tax IDs to a shipment:
- Sender tax IDs — your own registrations, saved once in the Parcelcraft settings and prefilled onto every shipment.
- Receiver tax IDs — your customer's registrations, prefilled automatically from the tax IDs saved on their Stripe customer record.
Both kinds can be reviewed, edited, added, or removed on each shipment before you buy the label.
Save your sender tax IDs
- Open the Main settings tab of the Parcelcraft Settings page and scroll to the Tax IDs section.
- Click Add a tax id, then choose the tax ID type, enter the number, and select the issuing country (the European Union appears as its own entry for EU-wide registrations like IOSS).
- Click Save. Repeat for as many registrations as you hold — for example, an IOSS number for the EU and a UKIMS number for the UK.
Saved sender IDs are shared account-wide and appear on every new shipment. You can update or delete them from the same list at any time.
Receiver tax IDs come from Stripe
If the customer on an order has tax IDs saved on their Stripe customer record, Parcelcraft copies them onto the shipment as receiver tax IDs, translating each Stripe tax ID type to the closest carrier equivalent — an EU OSS VAT number becomes an IOSS identifier, a Canadian GST/HST number becomes a GST identifier, and so on. There's nothing to configure; keeping your customers' tax IDs current in Stripe is enough.
Review tax IDs on a shipment
On any shipment, expand Show more options in the shipment options section — the Tax IDs list sits below the option columns:
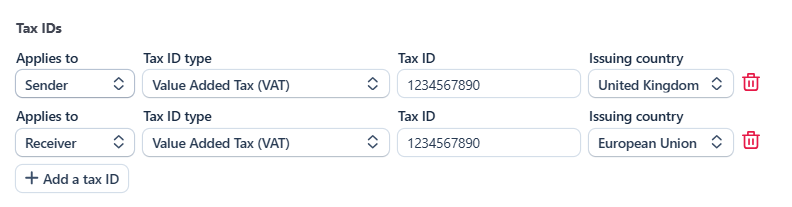
Each row shows who the ID applies to (Sender or Receiver), the tax ID type, the number itself, and the issuing country. Edit any field in place, remove a row with the trash icon, or click + Add a tax ID to add one just for this shipment — one-off additions don't change your saved settings, and per-shipment edits don't either.
A couple of rules to know:
- Incomplete rows are left off the label. A tax ID needs a type, a number, and an issuing country; if any of the three is missing, the row is skipped rather than blocking your purchase.
- The type list follows the carrier. The tax ID type dropdown only offers types the selected carrier accepts. A prefilled ID whose type the carrier doesn't support stays visible so you can see what's on the shipment, with a note that the carrier may ignore it.
Which tax ID types each carrier accepts
| Carrier | Tax ID types |
|---|---|
| USPS | VAT, IOSS |
| UPS | VAT, IOSS, VOEC, HMRC |
| FedEx | VAT, IOSS, GST, EORI, HMRC, UKIMS, EIN, SSN, State Tax ID |
| DHL Express | VAT, SDT, EORI, EIN, SSN, Federal Tax ID, State Tax ID, FTZ, CNP, DUN, and deferment accounts (DAN, TAN, DTF) |
Note: DHL Express accepts IOSS numbers under the GB VAT (foreign) registration (SDT) type, so pick SDT when sending an IOSS number on a DHL Express shipment.
For other carriers — and when quoting all carriers — the dropdown offers the full list of types, and the carrier uses the ones it understands.